

Whether you’re looking to clean up noisy recordings, create interesting rhythmic pads and vocal effects, or add sizzle to a drum track, the seemingly humble noise gate should be your weapon of choice. Here are some concepts and ideas to help you make the most of yours.
Know When And Where To Use Gates
As the first-line solution for background noise reduction, the gate is a staple effect when working with recorded material, often deployed in similar numbers to compressors and EQs – so understanding how best to deploy it is clearly important. Perhaps most pertinently, since your DAW offers instant recall of the entire mixer and its hosted plugins, and places no limit on the number of them you can use at a time, there’s really no need to destructively record through gates these days – far better to insert them as required at the mixing stage, so that nothing is lost from the original recordings. And in terms of signal path, the rule of thumb is simply that a gate should always go before EQ and compression, as those processes will inevitably alter the response of the gate if it follows them, thereby requiring time-wasting readjustment of it. In its fundamental role as a mixing tool, all the gate is doing is attenuating noise, so there’s no reason not to put it right at the start of the chain.
Sidechained Gating – Bring The Rhythm
Gates were originally designed for the elimination of background noise, but thanks to the integration of external sidechain inputs in both software and hardware models, they also make for powerful creative effects.
Probably the most frequent artistic implementation of gating is the technique colloquially known as ‘trance gating’. This involves inserting a gate onto a synth pad, string, vocal or other sustained sound, then keying the sidechain input off a ‘silent’ (ie, not audible in the mix) trigger such as a hi-hat or other easily programmable percussion line. As the gate opens and closes with every incoming transient, the pad is rhythmically chopped up – the ideal hand-raiser for any trance track, obviously, but also a tasty sonic embellishment in pop.
For extra groove interest, try feeding a full drum and/or percussion loop into the sidechain. You can use the sidechain’s filter – or a separate filter/EQ plugin if your gate doesn’t have one built in – to shape and focus the response as required, removing the kick drum from the sidechain, say, or exaggerating the hi-hats.
Reinforce Drums And Other Sounds
A sidechained gate can be thought of as the opposite to a sidechained compressor: while the second lowers the volume of one sound when another is present, a gate enables the keying signal to effectively ‘trigger’ the gated sound whenever it exceeds the Threshold (opening the gate), which is particularly useful for automatically adding enhancement layers to drum sounds. Snare drum not quite crisp enough? Fire up a white noise-generating synth, run it through a gate and key the sidechain off the snare to have the noise pop through which every hit. Kick drum lacking in the sub department? Do the same again, but with the synth outputting a low sine wave and the gate keyed off the kick.

Tighten Up Multi-Channel Recordings And Coexistent Sounds
The external sidechain on a gate is also helpful when you need to ensure that the volume envelopes of two or more directly related signals lock together tightly. For example, the bottom mic on a snare drum invariably picks up rattle from the snare wires every time the kick drum hits, and if that’s not something you want to have to deal with manually, you can automate the process by inserting a gate into that channel and sidechaining it off the top snare mic so that it only opens when the snare drum is struck. And although certainly demanding great care when it comes to setup, keying a sidechain-enabled gate on a bassline off the kick drum, or a slow-release (see below) gate on a backing vocals group off the main vocal, can work wonders for pulling those elements together.
Push The Envelope
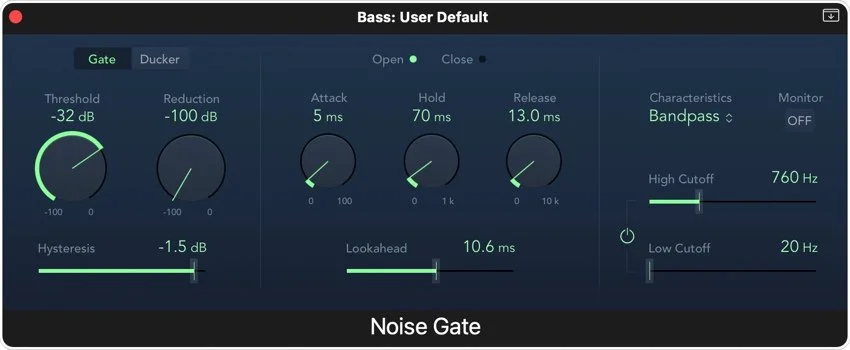
Whether you’re using a gate as a purely corrective tool for doing away with noise or ‘gluing’ multiple signals together as described above, or drawing on its creative potential as a rhythmic effect, the controls you’ll find yourself spending the most time with once the Threshold and Hysteresis are established are those of the response envelope. The Attack control sets the time it takes for the gate to open when the signal exceeds the Threshold; Hold sets the time the gate stays open when the signal falls back below the Threshold; and Release is the time it takes for the gate to close after the Hold stage. For noise reduction, the ideal positioning of these parameters will be dependent on the dynamics of the input signal, while for rhythmic gating, they’ll define the choppiness/smoothness of the start and end of each sidechain-triggered ‘note’. In the latter case, the ability to automate Attack, Hold and Release lets you change the shape of the gated notes in real time as the part progresses.
Get Retro With Reverb
With ’80s-style production currently enjoying something of a comeback in the pop arena, gated reverb is very much back on the snare drum processing agenda and easier than ever to set up thanks to the in-built gating circuits of plugins such as LiquidSonics’ Cinematic Rooms and Lustrous Plates, to name but two. Indeed, even if your reverb of choice isn’t capable of self-gating, any plugin gate will be up to the task: just stick it after the reverb with very short Attack and Release times, and whatever Hold length works for the track dialled in, and optionally key the sidechain input off the snare drum for a more precise and readily tweakable response than you’ll likely get from the reverb itself.
How do you like to put gates to use in your mixes? Let us know in the comments.
Photo by ASBA Drums on Unsplash
